Self tuning of noise reduction in Lightroom
To obtain the best of your photos, digital treatment of them on computer is the best way to do. It can be done using Raw file images when shooting. You then use dedicated software, famous one being Lightroom or Dxo Optics Pro. After an evaluation of both, I have selected Lightroom because of its additional features (geolocation, diaporama, books, …), and its easiest way and speedy way to use it. Dxo Optics Pro was a better choice regarding quality of treatments, but those two software are quite equivalent today on that topic.
Noise reduction
One of the most important algorithm integrated in those software is noise reduction one. Those software are replacing noise removal features integrated into cameras. Thanks to computation power available into computers, we can obtain better results when working that way.
Dxo Optics Pro have a very effective noise reduction algorithm, maybe too effective for my taste. It prefers noise removal to details preservation all in all. Its algorithm is adapting itself to ISO sensibility that have been used during the shot. Then noise removal will be automatically more important at 3200 ISO than 100 ISO.
 Lightroom have an noise reduction algorithm which is easier to tune when you want to keep those details. Its big drawback is that it is not able to take into account ISO used when shooting. To have the best results, you should then modify independantly each parameters for each photo and each ISO. When you have several hundreds of holidays photos, you don’t have time to do it that way. Then there are 2 solutions :
- use a medium noise reduction setting for all photos and all ISO, having a risk to remove details at low ISO and keep too much noise at high ISO.
- Use an external plugin for Lightroom which will set correct noise reduction settings in regards to ISO sensibility used.
“JF Bulk Develop settings” plugin
This plugin is available on this website.
It can be fully evaluated during 6 weeks. After this period, it is still functional by it can manage only 8 photos at the same time. Giving a donation to the author and you will be able to register the plugin and receive a code to fully use it.
When installed, it’s possible to use it through menu File –> External modules

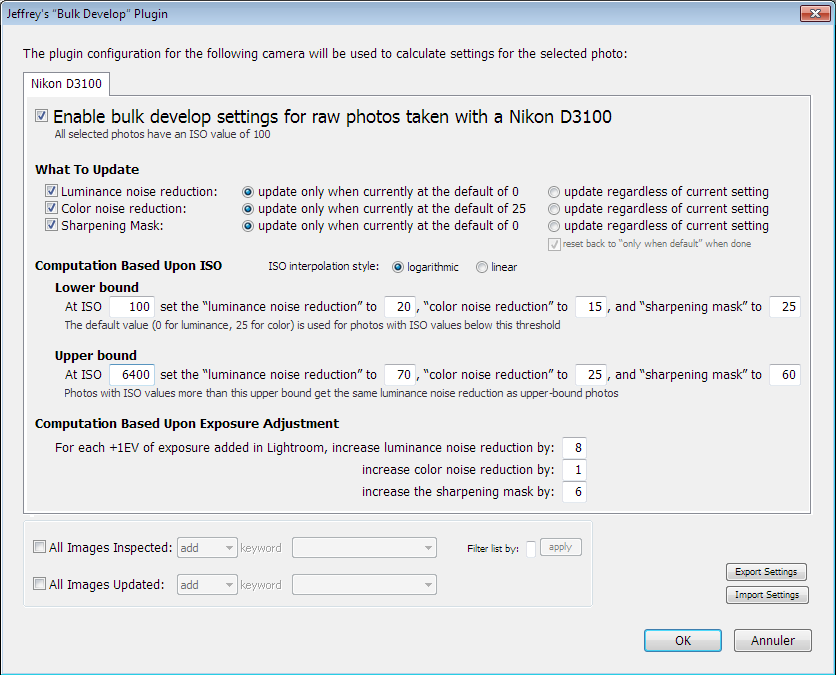
What is it doing exactly ? When setup regarding noise reduction for lowest ISO and highest ISO is done (for instance doing so for 100 ISO and for 6400 ISO), it is able to set the correct setting for all ISO in the middle, using a simple proportional law. This is really effective and you’re going to obtain very good results.
The plugin is also taking into account eventual increase of luminosity you have done in Lightroom on your photos. Then the plugin have to be used after luminosity/contrast of your photos is tuned. I advise you to launch it when all other tuning have been done : in that case, noise reduction algorithm is not activated during this period ( cursor is set by default to 0 for luminance noise reduction), your computer will be more reactive and other algorithms quicker.
Note also, that the plugin can conditionaly tune parameters of images : if a cursor have already been moved (the value is different from 0 or 25) then tuning that you have already done won’t be modified. To close the chapter, you have also configuration parameters different for the each of your cameras (you lucky devil !).
 Tuning the plugin
To find the tuning parameters you have to follow those steps :
- Take RAW file shots of the same scene but with different ISO settings (100, 400, 1600, 6400 for example)
- use camera auto-exposure feature to keep the same level of luminosity for each shot.
- import those photos into Lightroom
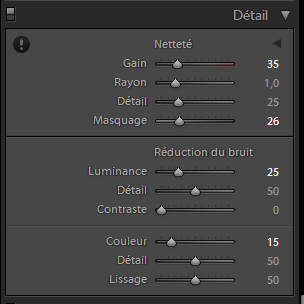
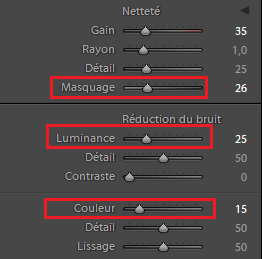
- Tune with great care noise reduction parameters for those photos. Most important cursors are Luminosity, Color and Masking.
- you should discover by yourself that there is naturally a proportional rule between your settings and the ISO level of the shots.
- you can then enter the settings you have found into the plugin for the ISO range you want to automatically manage :
- Lower bound : At {min ISO value in the range} set
- the “luminance noise reduction to {Luminosity cursor value for this ISO},
- “color noise reduction” {Color cursor value for this ISO}, and
- sharpening mask to {Masking cursor value for this ISO}
- do the same for Upper Bound ISO value of the range
- Lower bound : At {min ISO value in the range} set
Let’s speak a little about the parameters relative to luminosity increasing of shots inside Lightroom (For each +1EV …), I myself have’nt done a new batch of photos to find those values. All in all, this is mathematically the same, and +1EV means also doubling the ISO sensibility. I’ve then reused previous tuned values in regards to a 2x ISO increment (100 to 200 ISO for instance).
Other tuning relative to noise reduction (Details, Contrast, …) have a very subtle impact, I’m myself not using extensively those parameters.
My configuration for a Nikon D3100
I everytime prefer to keep some noise but be sure not to remove any details. Following that rules I have obtained those values for my D3100 camera :
- Lower Bound
- At ISO 100 set the “Luminance noise reduction” to 20, “color noise reduction” to 15, and “sharpening mast” to 25
- Upper Bound
- At ISO 6400 set the “Luminance noise reduction” to 70, “color noise reduction” to 25, and “sharpening mast” to 60
- Computation Base Upon Exposure Adjustment
- For each +1EV of exposure added in Lightroom, increase “luminance noise reduction” by 8, “color noise reduction” by 1, “sharpening mask” by 6