
Control your Pioneer home theater amplifier using http requests
 Pioneer home-theater amplifiers can connect to your LAN using ethernet cable or wifi network. They can be remotely controlled by your main smart home controller or other kind of devices. In old days this control was done through a telnet connection. It means the controller can act as a telnet guest and this isn’t everytime possible.
There’s another method, less documented, which uses http requests. This method may not work with all Pionee references, particularly the old one. I will try to maintain a compatibility list if you provide your test results
Compatibility
| Model | Verified | http requests |
|---|---|---|
| Pioneer SC-LX59 | 01 nov. 2016 | Compatible |
To verify compatibility :
- Define IP address used by your home theater amplifier.
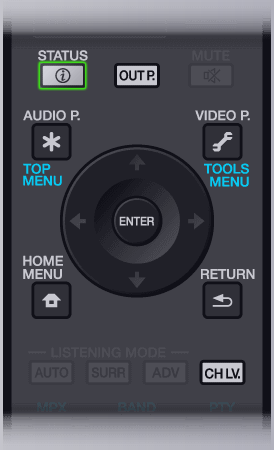
For the SC-LX59 model, IP address is displayed on screen and on amplifier display when pressing STATUS key on the remote.

- In a web browser, open the webpage at address : http://amplifier_IP_Address/StatusHandler.asp
You should have this kind of answer :
{"Z":[{"MZ":{"P":1,"V":117,"M":0,"F":25}},{"Z2":{"P":0,"V": 21,"M":0,"F": 6}},{"Z3":{"P":0,"V": 21,"M":0,"F": 6}},{"HZ":{"P":0,"V": 21,"M":0,"F":25}}],"DSP":2,"L":"0881","A": 3,"HOA":1,"LC":"STS" ,"MA":0,"MS":"0000000","MC":0,"HP":0,"HM":0 ,"DLBES":1,"DLBSR":1,"MN":"SC-LX59/SYXJ8"} - If you have this kind of answer, it should confirm the compatibility of your amplifier with http requests ( I’m waiting you confirm for other models)
You can then continue to read the post 🙂
Requests format
Status request
This is the one we’ve just seen which answer is device status.
Format : http://amplifier_IP_Address/StatusHandler.asp
Example : http://192.168.0.201/StatusHandler.asp
There’s no input argument. Output is in JSON format. If we look in details about answer contents, we can find those information :
- A status for each of the different audi zones of amplifier, the “Z” bloc containing
- The main zone “MZ”
- The secondary zone “Z2” if available
- and the following audio zone depending of your amplifier options
- Information about those zones are the same for all :
- “P” : Powered ON (1) or Powered OFF (0)
- “V” : volume defined with the values in this excel file from Pioneer
- “M” : Mute ON (1) or Mute OFF (0)
- “F” : Selected input defined with the values in this excel file from Pioneer
- I haven’t took time to understand the following values, but their meaning should all appear in the same excel sheet
Amplifier control request
This request changes a parameter of the amplifier (volume, input, …)
Format : http://amplifier_IP_Address/EventHandler.asp?WebToHostItem=
Example : http://192.168.0.201/EventHandler.asp?WebToHostItem=PF
There’s an input argument following the “=” which is the command to be sent. No particular output from this request apart the standard http status feedback.
Codes to be used are strictly equivalent to those sent through telnet. Those codes are exhaustively listed in the excel file from Pioneer![]() .
.
Setting a new peripheral in eedomus to control amplifier
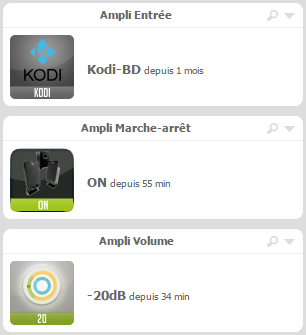
I need to control only three parameters : Power, Volume, input selection. I’ve then added three new http control peripherals for eedomus controller for each parameter
The post Mobile operator Free propose free SMS is indicating the way to create those peripherals.
Values to be defined for each peripherals are described below.
Power ON/OFF control
Value update request should contain those parameters :
- Update request =
http://amplifier_IP_Address/StatusHandler.asp - XPATH path (for the main audio zone) =
(//MZ/P) * 100
- Don’t forget to select option “Convert JSON to XML”

Action values are those one :
- OFF =
http://amplifier_IP_Address/EventHandler.asp?WebToHostItem=PF - ON =
http://amplifier_IP_Address/EventHandler.asp?WebToHostItem=PO

Input selection
Value update request should contain those parameters :
- Update request =
http://amplifier_IP_Address/StatusHandler.asp - XPATH path (for main audio zone) =
//MZ/F

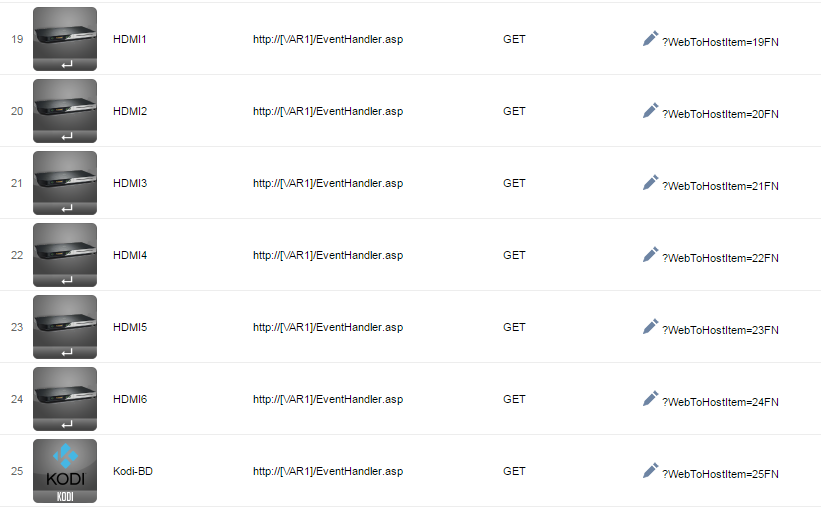
There are lots of action values, they’re all listed in this excel sheet . Here is an extract for the most useful :
- HDMI1 input =
http://amplifier_IP_Address/EventHandler.asp?WebToHostItem=19FN - HDMI2 input =
http://amplifier_IP_Address/EventHandler.asp?WebToHostItem=20FN - HDMI3 input =
http://amplifier_IP_Address/EventHandler.asp?WebToHostItem=21FN - HDMI4 input =
http://amplifier_IP_Address/EventHandler.asp?WebToHostItem=22FN - HDMI5 input =
http://amplifier_IP_Address/EventHandler.asp?WebToHostItem=23FN - HDMI6 input =
http://amplifier_IP_Address/EventHandler.asp?WebToHostItem=24FN - Bluray input =
http://amplifier_IP_Address/EventHandler.asp?WebToHostItem=25FN
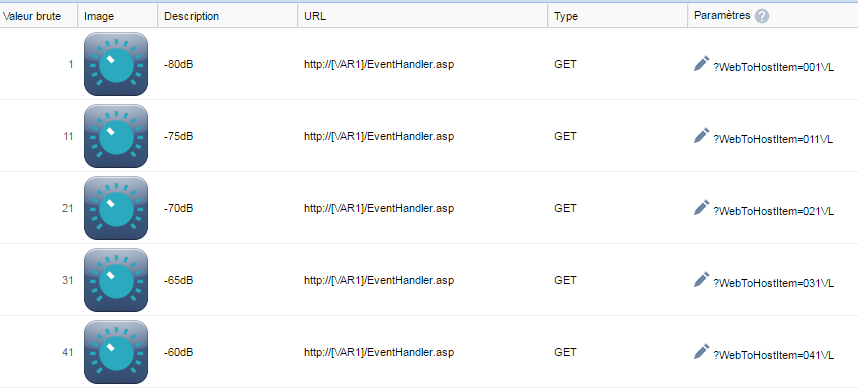
Volume control
I control volume using 5dB steps. A finest tunig is possible, amplifier steps being 0.5dB. If increasing the number of steps, you should add the missing control values and adapt the rounding done with the update request (for instance using a 2.5dB step , request rounding should be modified to ... div 5)) * 5 ... ).
The volume range’s from -80 dB (value is 1) to +12dB (value is 185). An increment of 1 of the value means a 0.5dB increase in volume.
Value update request should contain those values :
- Update request =
http://amplifier_IP_Address/StatusHandler.asp - XPATH path (for the main audio zone) =
(round((//MZ/V - 1) div 10)) * 10 + 1
Here is the beginning of actions for the volume control :
- Volume -80dB =
http://amplifier_IP_Address/EventHandler.asp?WebToHostItem=001VL - Volume -75dB =
http://amplifier_IP_Address/EventHandler.asp?WebToHostItem=011VL - Volumen -70dB =
http://amplifier_IP_Address/EventHandler.asp?WebToHostItem=021VL - Volume -65dB =
http://amplifier_IP_Address/EventHandler.asp?WebToHostItem=031VL - Volume -60dB =
http://amplifier_IP_Address/EventHandler.asp?WebToHostItem=041VL - …

Witam .
Wszystko działa bardzo prawidłowo, mam jednak problem z wybudzeniem amplitunera VSX924 ze standby.
próbowałem wysłać komendę dwukrotnie, ale nic nie przynosi skutku.
Jeśli zna Pan rozwiązanie proszę o podpowiedź.
Drugie moje pytanie dotyczy odczytu wartości poziomu dźwięku danej strefy. Mogę odczytać status urządzenia , ale jeśli chciałbym wyświetlić coś na przykład tworząc aplikację na tablet to nie wiem jak to wyciągnąć .
Pozdrawiam
Marek Dyk
In English :
Everything works very well, but I have a problem with waking the VSX924 from standby.
i tried to send the command twice but nothing works.
If you know the solution, please give me a hint.
My second question concerns the reading of the sound level of a given zone. I can read the status of the device, but if I would like to display something, for example by creating an application for a tablet, I don’t know how to get it.
Regards
Marek Dyk
To be honest with you I don’t remember having used wake up command. In my setup we power on manually amplifier which implies powering up other elements.
Regarding how to use it to display on a tablet, it depends on the skills you have, do you know how to program ? In my case I have an entire smarthome system , all smarthome systems are able to do http request and read back the value, also they have capacity to have funny display of values. Here is some example of free smarthome software to be installed on a server or a raspberry pi (for instance ) : jeedom, home assistant, domotics, … You can also buy a smarthome controller which will have such capacity. I used to use Eedomus controller.
Another way to do is to use Tasker which is an android application. It’s also able to do http request, and you can setup a display panel to show those values. However, this it a bit difficult to correctly set a panel because it has to be done directly on a smartphone or tablet with touchscreen.