
Change a wordpress domain name when hosted on an OVH shared hosting
This blog have move recently from domain http://vincent.recipon.fr to http://www.vrdigitalworld.com. This transfer have occupied some nights, because of several issues for which I haven’t found any answer on the web, although it was finally minor problems. Those difficulties are partly linked to particular aspects of OVH shared hosting.
The method I used is empirical and can clearly be improved, but it’d worked for me and my particular needs.
This post is describing the steps I used to transfer this blog, hopefully it may help others to prevent any similar issues. Note that I’ve decided not to use multisite option that’s now available in wordpress. I focused on keeping original website unmodified up to the end of the procedure.
Reference web pages
Here are the information I found on the web that helped me to change of domaine name :
- Google “How To” describing all the step to move to a new domain without loosing indexing : https://support.google.com/webmasters/topic/6029673?hl=en&ref_topic=6001951
-
SQL queries to change domain name of a wordpress website : http://sql.sh/988-requetes-migrer-wordpress
-
Move WordPress to a new domain : http://wpformation.com/deplacer-wordpress-nom-domaine/
-
Modify prefix of WordPress database after installation : http://wpchannel.com/modifier-prefixe-base-donnees-wordpress-apres-installation/
Specifics of OVH shared hosting
This OVH offer implies some technical constraints :
- a single directory www can be used to store multiple websites.
If you want to host several websites, you must install those in different sub-directories ( www/site1, www/site2).
It means also that you shouldn’t use automatic wordpress installation function of OVH but install wordpress by your own in the standard way. - A single database for all websites
Generally, a different database is used for each website, in that case it’s not possible. Each wordpress install should use tables in same database but with different prefix. Each website have a specific prefix to distingish its own tables from the other websites. Then forget the default prefix (“wp_”) when installing wordpress, but select a differentiating prefix for each install.
Steps to be done
Website transfer have to be done with a minimum level of risks. No way to modify the original website. We’re going to duplicate it for the new domain name and work on the copy. Here are the different steps :
- Buy a new domain name
- Duplicate original website directory to a new directory
- Setup OVH DNS with your new domain name
- Duplicate original website mySQL tables
- Change basic parameters of new website
- Test your new domain’s website
- Modify all the links into posts and comments
- Verify entirely new website
- Configure natural indexing of your new website
- Redirect your old domain name to the new one
Description of the steps
1. Buy a new domain name
We speak there to buy something, so naturally this step is easy. You can do so from your OVH management interface.
Note also that if you hosts you website to an OVH server, configuration is a little easier if you buy also the new domain through OVH.
2. Duplicate original website directory to a new directory
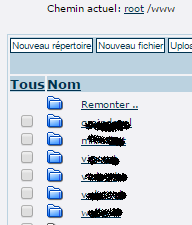 We’re going to fully duplicate original website, and we start by copying the files. Those can be accessed throug ftp in the www, or one of its subdirectory if you have multiple websites.
If original website is installed directly in www directory you’ll have to move it into a subdirectory. It’s done the same way presented here but without the last steps relative to domain name change.
Before doing the copy, I think you should make a backup copy of the website files on your personal computer (using for instance Filezilla).
The quicker solution to copy directory or file is file management online tool proposed by OVH : FTP Explorer. When using it, all the copy processing is managed on OVH servers then will be quicker than going through your personal computer. This tool can be accessed through management interface.
Choose an unequivocally directory name related to the domain name , you have to avoid mistakes resulting in modifying the old website instead of the new one.
3. Setup OVH DNS with your new domain name
We’ll need quickly to access to installation of the new website to continue the configuration. So we already point the new domain name to the directory containing the fresh copy . This is also done in the OVH management interface :

4. Duplicate original website mySQL tables
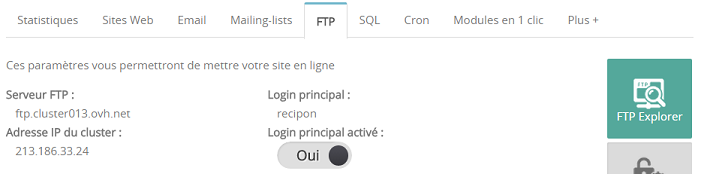
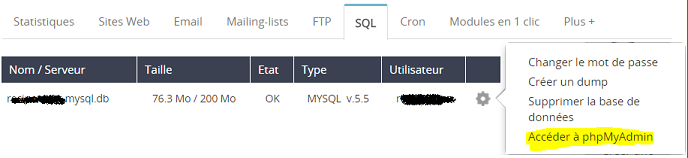
It is from this point that process is more complicated . You need an access to your database through the phpMyAdmin tool available in the management interface.
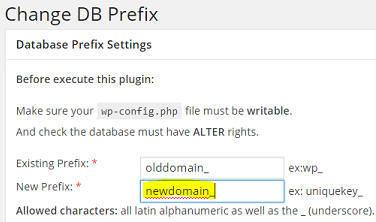
Having a single database, We must duplicate tables with prefix change. Unfortunately prefix changing means also several configuration parameters to be changed, which are stored in configuration table. To prevent manual modification, we’re going to use initial website with plugin “Change DB prefix“. This plugin enables to change table prefix on the fly.
Let’s start installing this plugin in old domain name, then modify table prefix with the one you would like to use in your new website. Current prefix name is indicated into the plugin, you just have to enter the new one :
Thanks to previous step, tables have now correct prefix, and corresponding configuration values have been changed accordingly. We can copy those tables to reuse them for the new website in a second step. Go back to phpmyadmin to do those copies.
Each table have to be copied individually. Don’t use batch copy function that can copy multiple tables at a time. This feature’s not able to keep integrity of the tables, and specific parameters are lost (auto-increment option and automatic index are not copied).
![]()
Each table is then copied individually using unitary copy, available into tab “Plus” when a table is opened. You have to tick auto-increment copy option. Target table name must also have a new temporary prefix, for instance backup_ .
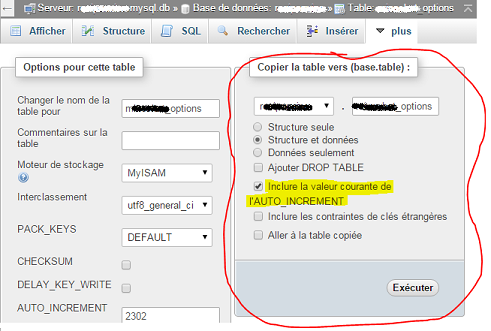 Do those table copies for all the tables of your original wordpress install. You should have at least 11 tables to copy.
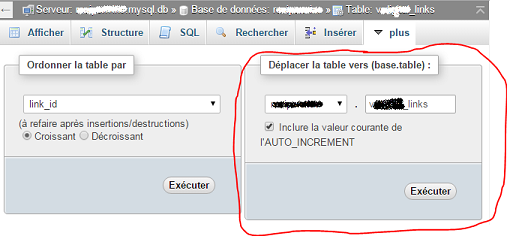
You have then at least 11 tables with “backup_” prefix. Go back to original website and reuse plugin “Change DB Prefix” to put initial prefix back.“Change DB Prefix” won’t be used anymore, you can deactivate or remove it.
Last thing to do is to change “backup_” prefix for those 11 (or more) tables using the new prefix. In the same way than copy function, we have to do it individually for each table by using the function “move“. New prefix name have to be the one you would like to have for your new domain’s website.
5. Change basic parameters of new website
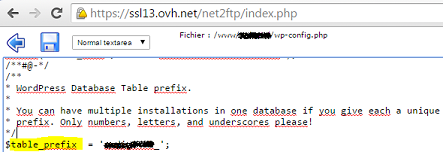
First modification to be done is to use new tables that have been created with new prefix. This parameter is defined in wp-config.php file located in install directory of your new website. Edit this file with net2ftp utility that have been used previously at step 2.
Parameter $table_prefix have to be changed. Its value must correspond to tables’ prefix you’ve selected for the new wordpress installation.
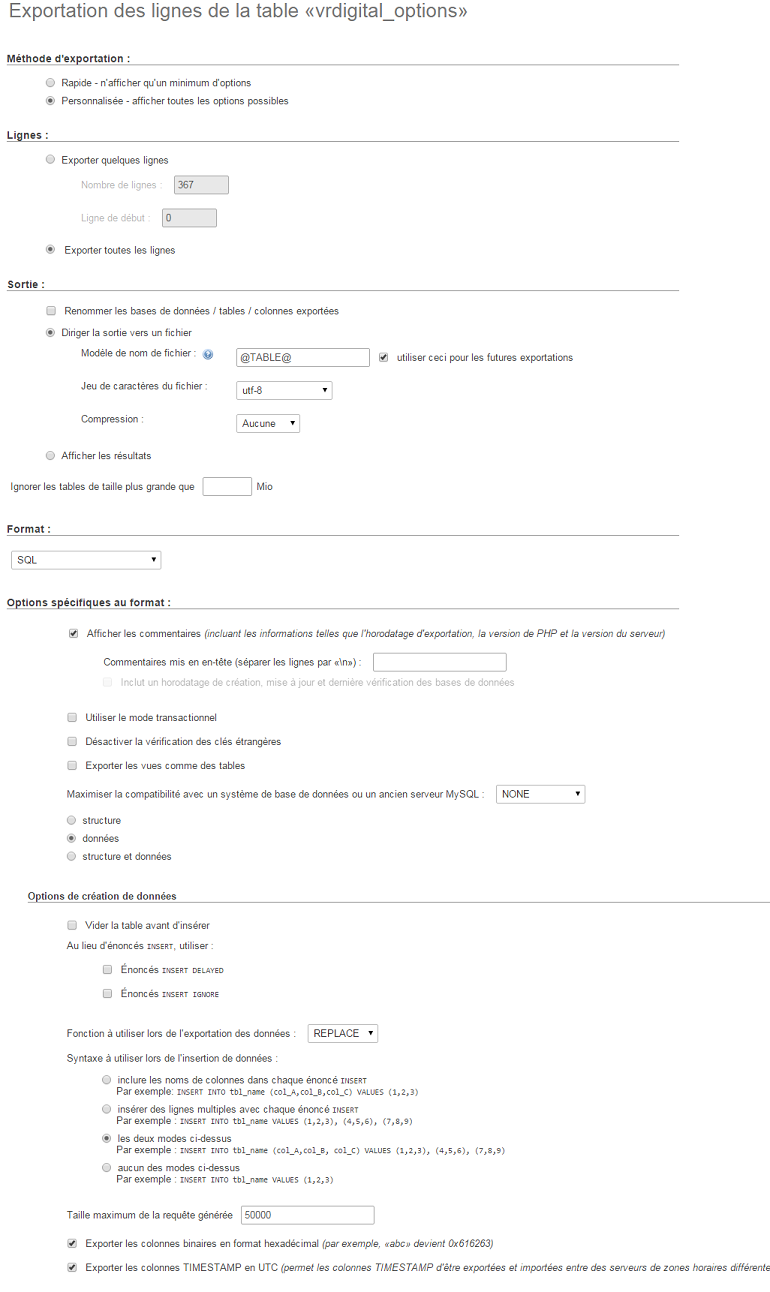 The remaining important parameters to be changed are located inside table xyz_options, xyz being the prefix you’ve selected. To modify those informations, I propose to use table export into an SQL file. The SQL file can be edited with text editor, then the modified data can be re-imported.
Use export function of phphmyadmin to export (!). Take care about parameters you’re going to use when exporting, or you may loose some information or break structure of the table. Export should only extract data, and a function “REPLACE” should be used in SQL statement. To have an overview of all export parameters, look at the snapshot on the right.
When export is done into a local file, modify it with a text editor ( I like myself notepad++ for windows). The 2 essential parameters to change are : siteurl and home that should reflect the new domain name. However, other parameters may contain old domain name. Use Search-Replace function of text editor to switch from that old domain names to the new one like in the following snapshot :
![]()
In the same manner some parameters may contain file hierarchy information pointing to specific files or directories, you have also to modify those to reflect directory change of new website. Then use, another time, Search-Replace feature of /www/old_directory/ to /www/new_directory/
When done, save the SQL file and reimport it into mySQL database. No specific configuration is necessary for the import step.
6. Test your new domain’s website
 Major modifications have been now done and you should be able to access to your new domain’s website. Enter into administration area to verify that everything seems to be fine.
7. Modify all the links into posts and comments
All the posts and comments have been transfered. This is a minimum … but unfortunately those elements include links to some parts of old domain name. We’re going now to replace those old domain names with the new one.
Process is identical to step 5 :
- export the tables of the new wordpress containing those posts and comments information. Export parameters are the same as step 5
- edit .sql files with a text editor
- Search-replace old domain names with the new domain name
- save the file and re-import it
Tables that have to be edited are those one (xyz being the table prefix you’re using for your new domain):
- xyz_postmeta
- xyz_posts
- xyz_commentmeta
- xyz_comments
8. Verify entirely new website
We’ve done all what we can to copy and change domain name, without breaking anything, the truth is that there may have some parameters or configuration that may have suffered during transfer, particularly for plugins. Some plugins can’ stand with manual modification. Old domain website is still active, you have then to copy back those parameters that have incorrectly been transferred.
Overall website should be verified, taking particular attention to specific features linked to specific plugins.
In my case, I had to reconfigure Hueman Theme and partly Contact Form 7 configuration.
9. Configure natural indexing of your new website
This procedure’s not specific to domain name change, I’m not going to describe everything. Still, you don’t have to forget and remind Google & Bing/Yahoo that you’re new domain name is active and have to be referenced by those search indexers.
It can be done through those interfaces :
10. Redirect your old domain name to the new one
There are 2 aspects to be taken into account now : transfer all the traffic from old domain name to new domain, but also transfer indexing of Google & Bing from old domain to the new one.
To organize transfer without losing natural referencing, you must have to keep old domain name active at least during 6 months and put in place a 301 redirect.
301 redirect can simply be done by editing .htaccess file which is located in root directory of your old domain name wordpress installation. You can use net2ftp to edit this file.
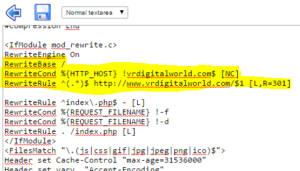 The following lines have to be added in this file just after line
 RewriteEngine On :
RewriteBase /
RewriteCond %{HTTP_HOST} !vrdigitalworld.com$ [NC]
RewriteRule ^(.*)$ http://www.vrdigitalworld.com/$1 [L,R=301]
Just after the file is saved, you should be redirected automatically to your new domain name website.
It’s then possible to go back to Google and Bing interfaces introduced in chapter 9 and use the option to transfer referencing from old domain to the new one. Doing that way, referencing from old domain will be transfered to the new domain name.


Bonjour,
Désolé, jamais reçu de notification, pour répondre à votre question, quand je suis arrivé sur votre site, le site était comme “cassé” pas de mise en page, un thème incorrect déstructuré .
J’ai dû vider le cache de mon navigateur, pour retrouver votre site avec une apparence correcte.
Un souci que j’ai déjà lu sur le forum de WordPress-fr.net avec le plugin WP Super Cache.
Bonjour,
Je viens d’effectuer un changement de nom de domaine d’un site wordpress hébergé sur OVH avec nom de domaine acheté sur OVH.
Je redoutais le processus, mais en gros ça s’est fait sans accros en une trentaine de minutes même pas, notamment grâce au technicien d’OVH qui m’a expliqué avant comment faire.
Voici comment j’ai procédé :
>> Sauvegarder site et BDD en offline (sur l’ordinateur) avant toute manipulation, par mesure de sécurité
Par exemple via le plugin wordpress udraftplus
>> Dans OVH
Commander le nouveau NDD sur OVH (pour que ce soit plus simple)
Espace client OVH
Onglet Hébergement
Sélectionner l’ancien NDD
Onglet Multisite
Bouton à droite “Ajouter un domaine…”
Rechercher le nouveau NDD (attendre un peu qu’il apparaisse après achat du NDD)
Laisser comme c’est A PART :
Dans Dossier racine ./ mettre www
(peut-être cocher également SSL ?)
Valider
Prise en compte en 1 à 24 heures
>> Dans le back office WordPress
Réglages
Onglet Général
Changer les 2 URL en mettant le nouveau NDD
Attention, inscrire l’URL en mettant le http:// ou https:// et sans mettre de / à la fin ( ex. : http://www.monsite.fr ou http://monsite.fr)
En espérant que ça vous aidera
Merci beaucoup d’avoir préparé cette explication et de la partager avec tout le monde !
Bonjour,
J’ai suivi les explications jusque là, mais je ne comprends pas ce qu’on doit faire sur le dossier racine. Pourriez-vous le détailler svp? Le dossier racine est bien Filezilla?
Bonjour,
Je vois que vous utilisez Hueman 3.1.7 et non 3.2.9, a-t-il un souci avec la dernière version, ne faut-il pas l’installer ?
Vous utilisez aussi le plugin Better WordPress Minify, plus de mise à jour depuis 1 an, n’est-ce pas dangereux? N’a-t-il pas de risque d’avoir des failles de sécurité ?
Et aussi le plugin qtranslate qui n’est plus présent sur wordpress.org
N’est-ce pas mieux d’utiliser un plugin comme WP Fastest Cache qui minifie en même temps son site (html+CSS)?
Merci
Bonjour,
J’ai toujours quelques appréhension à mettre à jour des éléments essentiels du site, il m’est arrivé d’avoir quelques mauvaises surprises.
J’ai également un problème de temps, et ne gère ces mises à jour qu’à intervalle assez long.
Pour les détails :
– Hueman 3.2.9 : non je n’ai pas essayé, je vais prévoir une mise à jour
– Better wordpress minify : j’avoue que l’extension s’est installée avec le thème, depuis je n’ai pas suivi. A voir pour changer effectivement
– qtranslate : je ne l’utilise plus, il a été remplacé par qTranslate-X
– WP Fastest cache : je ne connais pas cette extension, je vais regarder. Que vaut t’elle par rapport à “DB Cache Reloaded Fix” ?
Merci pour ces informations !
Bonjour,
Pourquoi faire une copie de votre site pour un changement de nom de domaine ?
Il faut juste modifier dans la base de données avec le script search&replace, l’ancien nom de domaine par le nouveau de domaine.
Puis Vérifier dans le tableau de bord dans Réglages, que le nouveau nom de domaine est mis.
ou
http://quick-tutoriel.com/changer-nom-domaine-blog-wordpress-en-30-secondes/
Merci
Bonjour,
Pour ce genre de modification dans lequel on modifie en manuel des fichiers de configuration, on n’est pas à l’abri de mauvaise manipulation. Par ailleurs ce qui fonctionne pour un site peut s’avérer non fonctionnel pour un autre, par exemple du fait que les différentes extensions ne sont pas les même.
Il me semble donc dangereux de ne pas travailler sur une copie du site web. C’est d’ailleurs un mode de fonctionnement communément admis dans l’informatique : on sépare le serveur / site web de production (celui utilisé sur le web) du serveur / site web de développement utilisé pour modifier et tester les modifications avant mise en production.
Bonjour,
désolé quand je suis arrivé sur le site, la sidebar était tout en bas, l’article prenait tout la largeur, j’ai actualisé 2 foix, F5+Maj mais pareil, du coup, j’ai posté mon commentaire et puis après le rechargement le site apparait normalement, je ne comprends pas pourquoi j’ai eu ce souci..
Là c’est bon.
Bonsoir,
Vous devez avoir un souci avec votre plugin cache, la page ne s’affiche pas correctement, le thème est cassé.
je préfère le plugin zencache, si j’avais de l’argent je prendrais le plugin wp rocket
Bonjour,
Je ne comprend pas votre remarque. Tout se passe bien me semble t’il sur le site. Qu’est ce qui ne s’affiche pas correctement ?